Blogging with Showit is one of THE most impactful ways I market my business (and my clients‘ businesses!). If you have a business and care about your SEO (which is probably all of you, given where you are right now) – you need to blog, period. Blogging is such a great way to introduce new audience members to your business, provide them with instant value, and (over time), drive traffic!
And even if you’re not blogging now, but think you may blog for your business in the future – you’ll want to keep the user-friendliness of your website platform for blogging in mind when you’re choosing it. When it comes to blogging for business, I truly believe that blogging with Showit is the best option out there – the mix of design flexibility and functionality is unparalleled.
Want help choosing the right platform for your website? Here’s my breakdown of Showit vs. WordPress and Showit vs. Squarespace.
Because Showit integrates with WordPress for blogging, it *can* be confusing to figure out how it all fits together – so here’s exactly how it all works, and how to start blogging with Showit.
How does blogging work with Showit?
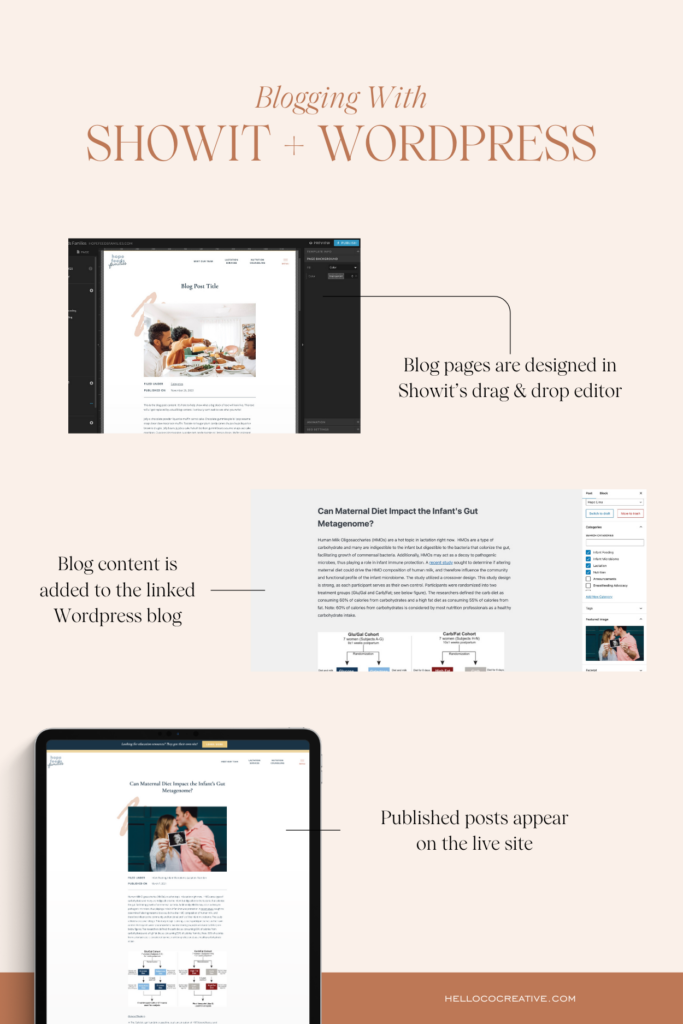
Showit is where the design for your blog pages (like your blog feed, a single post, a category, etc.) lives, and WordPress is where your content is managed. Think of it like publishing a book: WordPress holds your manuscript, while Showit actually prints and packages your book and its cover (and is where people read the post).
Is Showit good for blogging?
Yes! Showit is a great way to get complete design flexibility while maintaining a sh*t ton of functionality with your blog. With Showit’s advanced blogging plan, you can install pretty much any plugin onto your website (and therefore, keep adding functions).
These plugins can also help you optimize your blog posts for keywords and improve your Showit website SEO.
It’s easier to design on than most WordPress themes (since it’s a drag-and-drop editor that’s basically like using Canva, for your website), and it’ll let you create sections that display on every blog post/page (like your blog sidebar, or the extra sections I have at the bottom of this post).
Want help choosing the right platform for your website? Here’s my breakdown of Showit vs. WordPress and Showit vs. Squarespace.
How To Start Blogging On Showit
To start a blog on Showit, you’ll need:
- Blog page designs (check that your website template has them before you buy, create them, or hire a designer to do it for you)
- A basic or advanced Showit blogging plan (get a free first month using my affiliate link)
- To tell the Showit team (just open a new chat from inside the designer) you want a new blog setup
Showit does the all the techy parts of setting up a new blog for you, and you just get to kick it while they do it all. If you have an existing blog on a different website, you’ll need an advanced Showit blogging plan to migrate it all over (tbh, I recommend the advanced plan for everyone), and then the Showit team will help with your WordPress or Squarespace content migration.
Note: If you have a blog through your Wix website, you cannot export content – Wix won’t allow it. Unfortunately, the only method is likely copy/pasting the content manually!
Want to make sure your blog setup and settings are correct from the start? Here’s how.
How To Publish A Blog Post In Showit
To write and publish a blog post, you’ll log into yoursite.com/wp-admin. WordPress is where you’ll add text, format your post with headings, and add any other content (like images for your post, etc.). Once your post is live, WordPress will push it through to your Showit design, and it seamlessly ends up on your website.
Note: You can read more about Showit’s pricing and blog plans here! The basic blog includes access to pre-installed plugins, while the advanced plan includes the ability to install custom plugins.
New to Showit? Get a free first month using my affiliate link!
How to Migrate a Blog to Showit
If you already have a blog with posts written, Showit’s launch team will help you migrate the posts to your new WordPress blog – just select the “Advanced Blog” plan when activating your subscription!
If you only have a few posts or don’t need the advanced blog plan, you can manually move them by copy/pasting the content into new WordPress blog posts.
Note: If you have a blog through your Wix website, you cannot export content – Wix won’t allow it. Unfortunately, the only method is likely copy/pasting the content manually!
What pages do I need to start a blog?
In my opinion, the minimum pages you’ll need to have an effective, engaging blog are:
- Blog Feed (the “homepage” of your blog, where readers can see a list of recent posts)
- Blog Post (the design that displays when someone clicks on a post)
- Blog 404 (if you have a blog installed and active, this is now the 404 page across your entire website!)
How to Write a Blog Post with Showit & WordPress
The first thing you’ll need to do is get your blog post content into WordPress. You can either type it directly into WordPress or you can paste your content from a document (I prefer this method because I use a dictation plugin for Chrome to type most content).
Click on “Add New” and add your post content.
Add Content Blocks
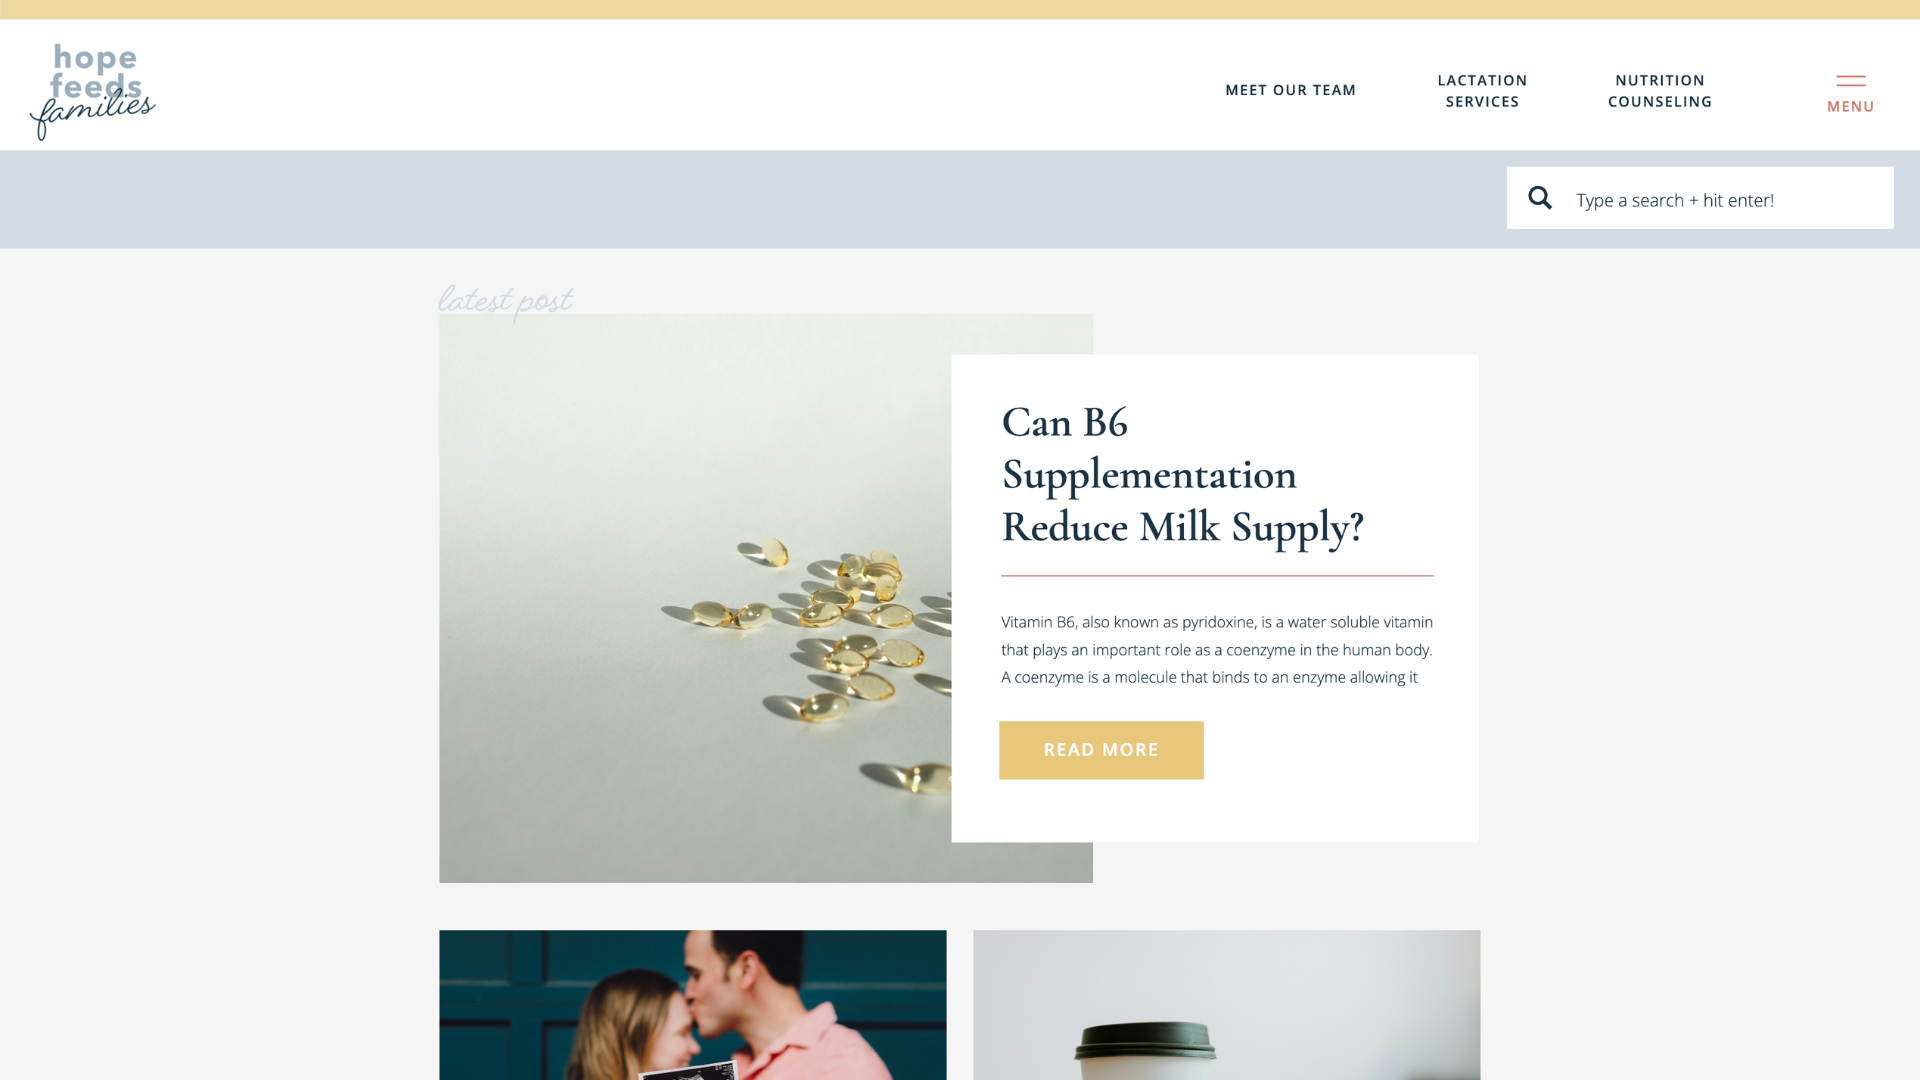
You can use content blocks in WordPress to add things like images and dividers to your posts. These get added directly in WordPress for each post – not in Showit!
Optimizing Images for Blog Posts
When your blog is created, you’ll have a WordPress media library (separate from your Showit media library). This is where you will add images to then add to posts.
Before actually adding images to your post, I recommend resizing the image files to make them smaller. This helps your blog post load more quickly! The recommendations for how to resize your files varies, but 2000 pixels wide is a safe place to start.
TIP: I love the Red Ketchup Bulk Image Resizer for resizing photos!
In addition to resizing images, I also like to add alt text for each image. You can do this after uploading the image and placing it into your post! Just click on the image, and type into the Alternative Text box in the right sidebar.
Alt text is used by screen readers for accessibility – it reads whatever you type as a description of the image. It’s also crawled by search engines, so adding alt text (especially if it organically uses keywords) is a great way to give yourself a tiny SEO boost.
>> Read this blog post for more easy SEO tips you can implement on your Showit blog!
Adding Categories & Tags
Before publishing, you can set the post’s categories and tags in the right sidebar. Think of categories as larger “buckets” of content that posts fit into, and tags as more specific topics to help people narrow things down.
Before adding these settings with each post, you may want to check your Showit design to see what it displays. Many blog designs will only display categories on a single post or the blog feed, so focusing on those rather than tags is likely more worth your time.
TIP: Try to plan your content “buckets” ahead of time and only create a category for things you know you’ll be able to generate multiple blog posts for! Creating new categories left and right is a surefire way to end up with a cluttered, confusing blog.
Optimizing Your Blog Post for Search Engines
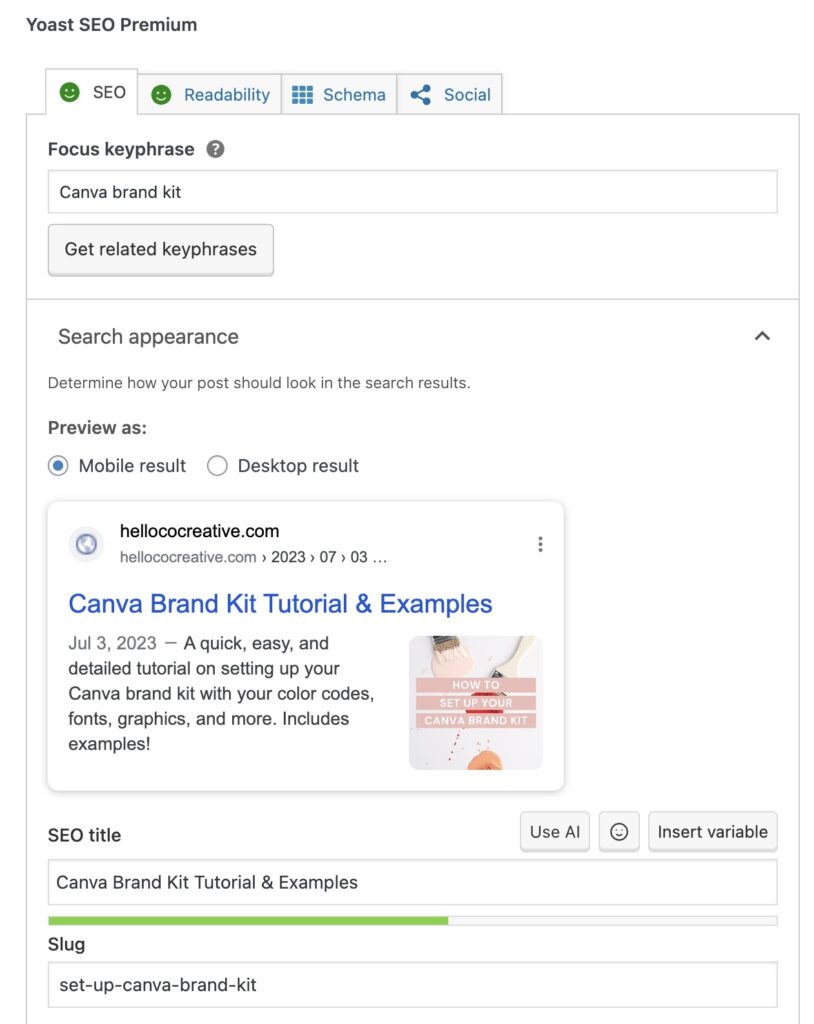
And here it is, one of the top reasons I love the Showit/Wordpress combo for blogging! Meet Yoast SEO, the plugin that gives you real-time feedback on your post and helps you improve its optimization.
The free version of Yoast SEO is included with basic Showit blogs. You’ll need to activate it by clicking Plug-Ins (in the left sidebar of your WP screen) → Yoast SEO → activate.
Once it’s active, Yoast SEO will show up when you’re editing a post (just below the post content block). You’ll need to enter a focus keyphrase to help Yoast analyze your post and give you feedback!
TIP: If you don’t know what keyphrase to use, play around with phrases you think people may Google in order to find your post! As an example, this post’s keyphrase is “Blogging with Showit.”
>> RESOURCE: How to Find Keywords
How to Use Yoast SEO
In the Yoast SEO plugin, you’ll set the SEO page title and description for your post. Try to use your keyphrase here! These pieces of writing are what displays in the search engine results page (SERP).
Yoast will guide you to write the title/description to the correct length, which is amazing if you’re like me and can never remember the recommended character count (PS – it’s 50-60 for a title, and 150-160 for a description).
You’ll also be able to set the “URL slug” for your post. This is the text that appears behind your URL (www.yourwebsite.com/blog/URLSLUG) for the post. I recommend streamlining this to as few words as possible while still using your keyphrase.
As you’re playing with Yoast, you may notice it giving you a “readability” score in addition to an SEO score (the “scores” come in the form of frowny/happy faces which is oddly motivating for a rule-follower like me). Yoast will decrease your score for things like long sentences, “too much” use of passive voice, high word complexity, and excessive paragraph length.
You can make your post more readable by breaking paragraphs into shorter segments (2-4 sentences each – throw out everything you learned in high school English, friends), adding headings and subheadings throughout, and simplifying your language slightly.
But in reality: you’re writing for people, not a plugin or a search engine! So when it comes to the “readability” rating, I recommend focusing more on overall consistency with your brand voice and making the post appealing to whoever you want to read it.
Take it from me, a girl with piles of frowny-face readability scores.
Write how you actually write, then use the Yoast plugin to optimize your post for SEO.
Publishing Your WordPress Blog Post
I always recommend previewing your posts before you actually schedule or publish them. This can help you see where you may want to add various content blocks (like spacers or images), and what your post will actually look like on your website!
Before you publish, you’ll also want to add a featured image. Depending on your blog design, a landscape or portrait-oriented image may look better, so choose according to what your blog actually looks like!
TIP: Read back through your post content before publishing and see where you can add links to other blog posts! Having more relevant info at the ready is a great way to keep people on your website and establish trust in your knowledge base.
TIP: If you’re like me and visualize the week starting on Sunday (like most planners), you’ll want to head to Settings → General in WordPress to make sure your “Week Starts On” is set to Sunday. I’ve incorrectly scheduled several posts due to this, since I click on the column my brain thinks a day should be in rather than paying attention to the date itself!
After Publishing Your Showit Blog Post
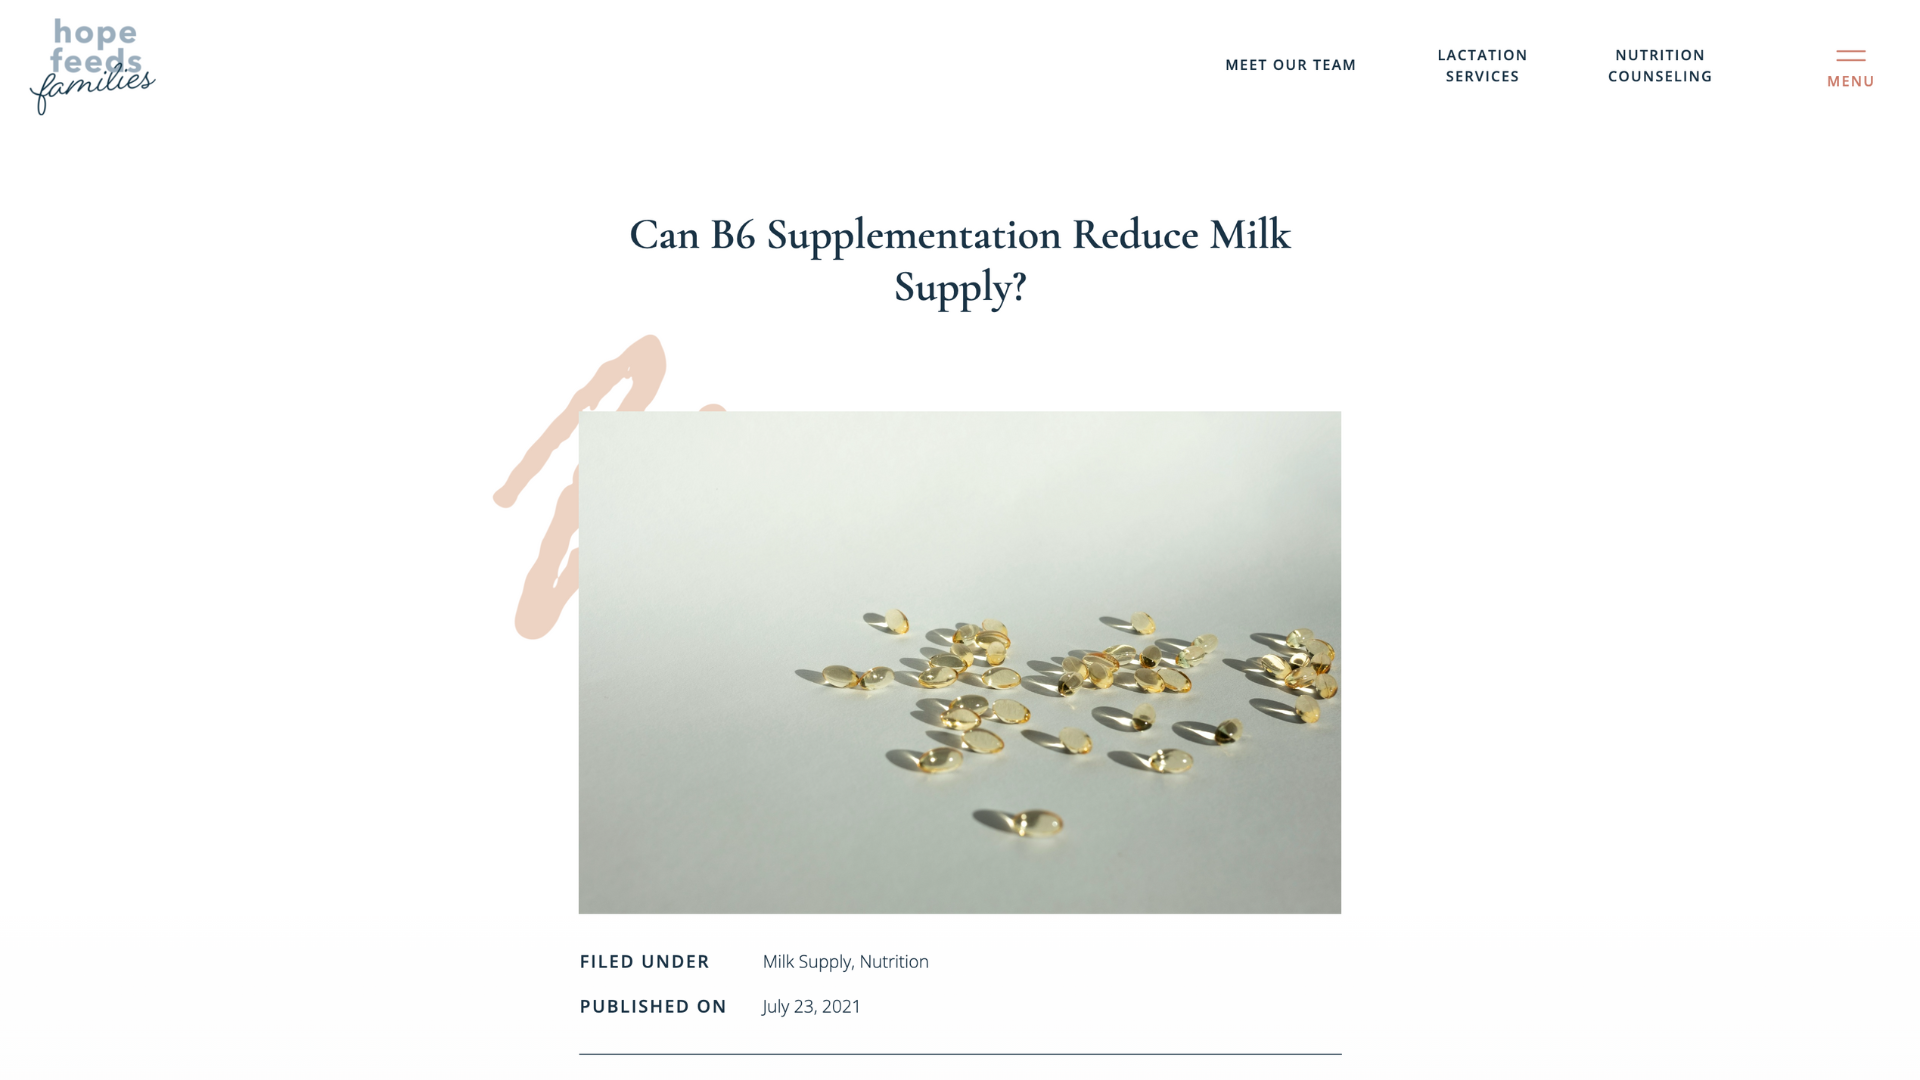
After you publish your blog post in WordPress, it will display at the URL you set (you can choose the slug yourself, which is the part that comes after .com, .org, etc) with the design from your Showit blog pages.
TIP: Want to notify Google that you have a new blog post to crawl? You can submit the URL for the post to your Google Search Console account.
Need help blogging with Showit? I gotcha covered.
>> Make sure your Showit blog is set up correctly with this post.
>> Browse my guide to choosing the right Showit website template for your business.
>> Get a Skip The Stuck!™ copy template to write the rest of your website pages without agonizing over every single sentence.